Sunday 27 March 2011

TI Series 2000 transponder reader

I just got the transponder reader working on a Sparkfun breadboard. The microreader takes about 100mA, and with an LCD shield the USB supply is struggling a bit. With an external PSU it's fine, though.

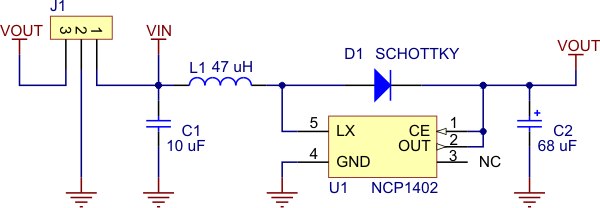
The microreader is wired in permanent read mode, which means the built-in serial ports will not be able to accept programming commands from the PC. To combat this, the microreader data is input on Pin 3 of the Arduino using NewSoftSerial.

The LCD shield is from eBay, from eKitsZone in Hong Kong. The shield was £12.50, as was the Duemilanove from the same source.

Here's the breadboarded circuit from the underside:


The code below works fine. The bit that identifies the transponders is crude, due to the limited selection of tags I have. But this is only a proof of concept, so there's no real problem. PCB shield to follow.

TI page on MicroReader: http://www.ti.com/rfid/shtml/prod-readers-RI-STU-MRD1.shtml

Here's the code. Blogger has removed all the indents, but Arduino's auto format function will repair that.

/*

Serial test program 3 - works with TI Series 2000 reader

This version uses the newsoftserial library as the native serial port is disrupted by
the reader's constant output.

*/
#include // upgraded serial library
#include // library for LCD

int inByte = 0; // incoming serial byte
int iMsgPtr = 0; // position in reader message
boolean bMsgOn = false; // true when message being processed
boolean bNextID = false; // indicates next byte IDs the transponder (utter bodge!)
NewSoftSerial tiReader(3,2); // define pin 3 as RX, 2 as TX
LCD4Bit_mod lcd = LCD4Bit_mod(2); // define LCD, 2 line display

void setup()
{
// start serial port for input from TI reader at 9600 bps:
tiReader.begin(9600);
// start serial port fordebug output to PC serial monitor at 9600 bps:
Serial.begin(9600);
// initialise the display, clear it and put up a message
lcd.init();
lcd.clear();
lcd.printIn("Transponder ID");
}

void loop()
{
if (tiReader.available() > 0)
{
// get incoming byte from serial port:
inByte = tiReader.read();
// if start of message byte detected declare new message
if ((inByte==1) && (bMsgOn == false))
{
bMsgOn = true; // message being processed
iMsgPtr = -1; // initialise message pointer
}
else
// if processing a message...
if (bMsgOn == true)
{
// if this is the message length byte
if (iMsgPtr == -1)
{
iMsgPtr = inByte + 1; // add a byte to accommodate the error check
bNextID = true; // next btye is start of transponder ID
}
else
{
// decrement message pointer, check for end of message
iMsgPtr--;
if (iMsgPtr == 0)
{
// end of message
bMsgOn = false;
}
// This is the bodged bit. All the tags we have use different first bytes, allowing them to
// be ID'd straight away. The code should really build up an 8-byte ID, checking when complete.
if (bNextID = true)
{
bNextID = false;
switch (inByte){
case 0x61: outputData("Keyring 1");
break;
case 0x63: outputData("Trainer tag");
break;
case 0xCD: outputData("Stick");
break;
case 0xE4: outputData("Keyring 2");
break;
case 0xF5: outputData("Disc");
break;
}
}
}
}
}
}

void outputData(char value[])
{
// output data to LCD, copying to the PC serial for debugging
Serial.println(value);
lcd.cursorTo(2, 0); //line=2, x=0
lcd.printIn(" ");
lcd.cursorTo(2, 0); //line=2, x=0
lcd.printIn(value);
}

Sunday 20 March 2011

Starting out with Serial

It looks like NewSoftSerial is the way to go: http://arduiniana.org/libraries/newsoftserial/

For programming Atmegas without the bootloader, here's an article on using PL-2303 instead of FTDI: http://www.uchobby.com/index.php/2009/10/04/diy-usb-to-serial-cable-for-3/

The Arduino will happily stuff data out to the serial port, next I need to get it receive data.

Arduino print info: http://www.arduino.cc/en/Serial/Print

Good code example and comments on DIYDrones: http://diydrones.com/forum/topics/razor-9dof-gps-arduino

Thursday 17 March 2011

Power from Pololu

Pololu make a neat 5V booster:


Also, a nice power switch:

Firmate and Firmata VB

Firmata VB is here: http://www.acraigie.com/programming/firmatavb/default.html

This looks like a great way to interface VB code to the Arduino, but may be a bit too much like overkill unless you want to read or change actual pin values. For my first app (Chrony store & forward), I will just be uploading the data from the Chrony into the VB program.

The Firmata pages are here: http://www.firmata.org/wiki/Main_Page

Sunday 13 March 2011

Chrony Resources

Good protocol and interface info from nopLabs:

Protocol: clickety

Serial interface: clickety

Simple remote control: clickety

Sunday 6 March 2011

About this blog

To anyone who is looking...

I'm looking at Arduino with a view to connecting up things from the chicken coop to a chrono for my rifles. As an inveterate fiddler, I'm really looking forward to making use of the tons of bits an pieces I have from days gone by.

I shall be posting my progress as I go, but in the meantime the blog will be used to store all sorts of tech info I will otherwise lose track of.

:)

Martin

Display Help

Dorkboard: http://dorkbotpdx.org/blog/scott_d/my_first_pcb_project

Linux-style, lots of display info: https://www.bulix.org/projects/lcd4linux/wiki/HD44780

Seriously Cheap Serial LCD from Arduino.cc http://www.arduino.cc/cgi-bin/yabb2/YaBB.pl?num=1260399444

PCB Manufacture

Eagle design tool: http://www.cadsoft.de/

Example/tutorial: http://www.krisbarrett.com/2008/09/03/make-a-custom-arduino-shield/

Aaron Eiche does a brilliant EAGLE tutorial here: http://aaroneiche.com/2010/06/24/a-beginners-guide-to-making-an-arduino-shield-pcb/

Really Bare Bones Board http://cdn.shopify.com/s/files/1/0038/9582/files/RBBB_Instructions_06.pdf?1260749296
(European distributor http://jeelabs.com/products/rbbb

How to iron PCBs
http://fullnet.com/~tomg/gooteepc.htm#1
http://gilmore2.chem.northwestern.edu/projects/garbz2_prj.php

Pulse monitor


is here: http://www.picotech.com/experiments/calculating_heart_rate/index.html

Saturday 5 March 2011

LCD character generator

Here:

http://icontexto.com/charactercreator/

Brilliant!

24C256 circuit


Get the Microchip part - it's better than the Atmel, apparently.

Wiring 1/2/3/ to Ground gives chip address 0x50.
Don't forget pullups on the data lines.
Write protect needs grounding to permit writing.


Sparkfun comments:

Pull up resistors NOT required.

Pins 4 & 5 are Analog pins NOT digital!

Dont forget to include Wire.begin() in void Setup() function.

This page refers: click here

try pastebin.com/f3a36644b code (thanks shinmai for the link! Saved me a ton!) and check for any output before you code your own!

Resource List

Useful websites


Arduino Site:
http://arduino.cc/en/

Site with great ideas:
http://bildr.org/

Good tutorials:
http://tronixstuff.wordpress.com/

Ladyada:
http://www.ladyada.net/learn/arduino/index.html

Microchip 24LC256
http://www.microchip.com/wwwproducts/devices.aspx?ddocname=en010823

Measuring stuff
https://sites.google.com/site/measuringstuff/

I2C 24LC256 video
http://www.youtube.com/watch?v=TGOvgiPD-ac
http://www.youtube.com/watch?v=6f-oz0p_6VY&NR=1
http://www.youtube.com/watch?v=a5f76YNybP4&NR=1

Hobbytronics UK
http://www.hobbytronics.co.uk/arduino

Arduino RTC / EEPROM Shield
http://www.practicalmaker.com/rtc/arduino-rtc-eeprom-shield

13cm.co.uk
http://www.13cm.co.uk/shop/

Cool Components
http://www.coolcomponents.co.uk/catalog/index.php?cPath=50

:oomlout
http://oomlout.co.uk/